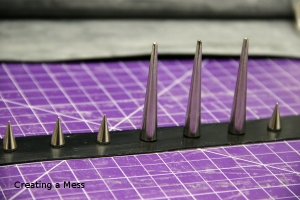
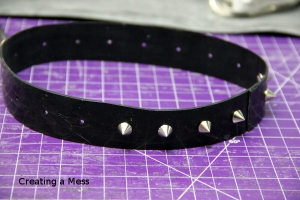
This is one I’ve been wanting to do for a while, but the shoot I’m going to use this for has been rescheduled several times and it seemed like a better idea to wait. I got impatient last week and decided to just go ahead and make it anyway – and, of course, to make a tutorial to show you how to make your own!
What you’ll need:
- latex (0.8 mm to 1.2mm – I chose 1.2mm as I used fairly large and heavy spikes)
- rubber cement
- rubber cement thinner
- spikes (size depends on the look you are going for)
- fabric hole punch
- gel pen (silver or gold work well – see extra tips below for more info)
- ruler
- measuring tape
- rotary cutter
Time from start to finish: About 30 minutes.
Step 1:
So the first thing you need to do is cut your latex to the size you need. Take a measurement of your head around where you’d like the crown to sit, and then decide how wide you’d like it to be. My strip of rubber ended up being 20 inches long and an inch wide. (*If you’ve never worked with latex before, there are several places you can buy it from online and I will eventually write a post with the basics of working with latex. Until then, ask whatever you need to know in the comments!)
Step 2:
When your latex is cut to the proper size and length, mark out where you want your spikes to go. I spaced mine 1 inch apart. Use a gel pen to mark where your holes need to go. BEFORE you punch your holes, place your spikes on the marks to see if you like the arrangement – that way you can change it if it doesn’t look right.
Step 3:
Punch your holes! The punch I used was just a cheap one from the fabric section of my local Wal-Mart.
Step 4:
Insert your spikes and screw them tight together – you don’t want them falling off while you’re wearing it. This may require a flat head screwdriver, but mine were all tightened by hand.
Step 5:
Now that your spikes are all in, all that’s left is gluing the two ends together. (I glued the ends first and then added spikes, but I found it would have been easier to do it the other way around.) When you do this, remember to only put glue on the front of one end and the back of the other. If you need a guide, hold the two ends together before you add glue and mark each with your gel pen to you know where to glue. To apply the rubber cement to your latex, make sure to clean it first with the rubber cement cleaner, and then use a small paintbrush or Q-Tip.
DO NOT put the two ends together yet. Wait for at least 5 minutes to let the glue ‘set’, then push the glued ends together and press firmly. If you want to make it even more secure, you can even put a spike through the glued seam after it has fully set between 12 and 24 hours later.
And now you’re done! Well, you will be when your glue sets.
Extra tips:
- Only use rubber cement to glue the latex together. Other glues will not hold, but rubber cement is meant for this and will create a permanent hold.
- Most suppliers only sell latex by the yard or meter. Thick latex like the stuff I used for my crown is pretty pricy (at about $35-40 per yard), but you can buy thinner latex in pre-cut strips from Sheet Latex International. The thinner latex won’t hold the heavy spikes, but you can laminate two or more layers together to create your desired weight or thickness. This will save you a lot of money if you don’t need a full yard of the heavy stuff.
- If you decide to use a different colour (instead of the basic black I used), try to choose a dark one. Latex stains really easily, and white, pink, and other pale shades and colours will discolour from contact with the metal. These stains are permanent.
- Gel pens – They won’t stain the latex, they wash off with a quick wipe of rubber cement thinner, and they’re cheap. Normal ball-point pens will not wash off, and neither will a lot of other writing utensils. Just go with gel pens to save yourself the trouble. (My suggestion of silver or gold is just my personal preference, but I’ve used other colours and they work just as well.)
- Try to use spikes with 2 pieces – the spike and the screw base. They are generally higher quality and will not tear the latex.


